Writing Simple Responses in ASP.NET Core
ASP.NET Core applications can come in a wide range of complexities. Large, monolithic applications can have hundreds of files and dozens of individual projects - but on the other end, a simple microservice (like the Request Header Parser Microservice) can take up just Program.cs and Startup.cs. As microservice architecture grows in popularity, it's becoming more and more important to understand how to write small programs that do one thing well. While you probably won't write any production apps that are quite this small, you may well write some pretty small apps.
The simplest ASP.NET Core app
The simplest ASP.NET Core app is essentially a "Hello, World!" program - no matter what request you send the app, it responds the same way. This is great for the Request Header Parser Microservice, because it only does one thing: reads request headers and sends them back as a JSON object.
Go ahead and open Startup.cs. To get the simplest app working, you need to add two sections of code. Firstly, add a using statement at the top of the file: using Microsoft.AspNetCore.Http;. Then, below the if (env.IsDevelopment()) {...} block, add the following:
app.Run(async context =>
{
    await context.Response.WriteAsync("Hello, ASP.NET Core!");
});
Your Startup.cs file should now look like this:
using Microsoft.AspNetCore.Builder;
using Microsoft.AspNetCore.Hosting;
using Microsoft.AspNetCore.Http;
using Microsoft.Extensions.Hosting;

namespace header_parser
{
	public class Startup
	{
		// This method gets called by the runtime. Use this method to configure the HTTP request pipeline.
		public void Configure(IApplicationBuilder app, IWebHostEnvironment env)
		{
			if (env.IsDevelopment())
			{
				app.UseDeveloperExceptionPage();
			}

			app.Run(async context =>
			{
				await context.Response.WriteAsync("Hello, ASP.NET Core!");
			});
		}
	}
}
Now, run your app and navigate to http://127.0.0.1:5000 in a browser. Your browser should simply read "Hello, ASP.NET Core!".
What just happened?
You just told your app to respond to every request by writing "Hello, ASP.NET Core!" to the screen.
app.Run()accepts a callback function that gets executed on every request. That callback always receives aHttpContextobject, and it can be asynchronous (but doesn't have to be). TheHttpContextobject has references to several other useful objects, including the HTTP request (anHttpRequestobject onHttpContext.Request), the HTTP response (anHttpResponseobject onHttpContext.Response), the session data (anISessionobject onHttpContext.Session), and more.context.Response.WriteAsync()accesses theHttpResponseobject and writes to the web page that gets served to the user.using Microsoft.AspNetCore.Httpgave us access toHttpResponse.WriteAsync(), which is an extension method.
You can verify that the app responds the same way no matter the request by trying a few different URIs on 127.0.0.1:5000, such as http://127.0.0.1/fake, http://127.0.0.1/your-name, and http://127.0.0.1/dotnet. It always responds the same way.
What now?
Feel free to take the time and experiment with different values for context.Response.WriteAsync(). Its first parameter is only ever a string, but you can return all sorts of data within that string, including HTML and JSON. Changing the response message to
await context.Response.WriteAsync("<h1>Hello, ASP.NET Core!</h1>");will render a nice big <h1> in your browser, for example.
A note about HttpResponse.WriteAsync()
For those who are new to backends, I want to point out that response headers are super important. Response headers tell the browser all sorts of things about the response, including what type of data it is, how much data is there, and other very important bits of information.
HttpResponse.WriteAsync() does not set any special response headers. If you run a simple GET request in Postman and look at the response headers from your app, you will see something like this:
Date: Mon, 07 Dec 2020 16:29:18 GMT
Server: Kestrel
Transfer-Encoding: chunked
and that's it. A very important header is missing: Content-Type, which is how the browser knows what kind of data the response contains. Browsers can often guess, especially when it's something simple like HTML, but it's better to be explicit.
Manually adding headers to the response
There are two main ways to add headers to the response, depending on which header you're trying to add.
Adding generic headers
You can add any header to the response you like (including custom headers you made up for your application) by accessing the Headers property on the HttpResponse object. This is an IHeaderDictionary, which inherits from IDictionary, so it has a lot of the same methods, including IDictionary.Add(). To add a header to the response, simply call the Add() method on the Headers property, set the key to the name of the header you want to add, and set the value to the value of the header you want to add. Let's add a custom response header, X-Application-Purpose, and set its value to FreeCodeCamp Request Header Parser Microservice:
app.Run(async context =>
{
    context.Response.Headers.Add("X-Application-Purpose", "FreeCodeCamp Request Header Parser Microservice");
    await context.Response.WriteAsync("<h1>Hello, ASP.NET Core!</h1>");
});
If you run your app and analyze the response headers in Postman, you will see your new response header in the header list.
This technique for adding response headers is generic and allows you to add any header you want to the application. But there is a simpler way to add a couple of the most common response headers.
Adding the Content-Type response header
The Content-Type header is so commonly used that the .NET team gave it its own property on the HttpResponse object: HttpResponse.ContentType. If your response is returning HTML, the proper Content-Type is text/html:
app.Run(async context =>
{
    context.Response.Headers.Add("X-Application-Purpose", "FreeCodeCamp Request Header Parser Microservice");
    context.Response.ContentType = "text/html";
    await context.Response.WriteAsync("<h1>Hello, ASP.NET Core!</h1>");
});
Note: You can also directly set the Content-Length header with HttpResponse.ContentLength. However, it's less common to need to set this header manually, and we won't be doing so in this series.
Setting the response status code
Another important part of the HTTP protocol is the status code. Status codes indicate, at a glance, whether a response was successful or not. If you don't set a status code on your response, it defaults to 200 OK, which may or may not be what you want - 200 OK indicates that the response succeeded exactly as expected.
To set the response status code manually, you need to access the HttpResponse.StatusCode property, which is an int. Go ahead and manually set the status code of our response to 200:
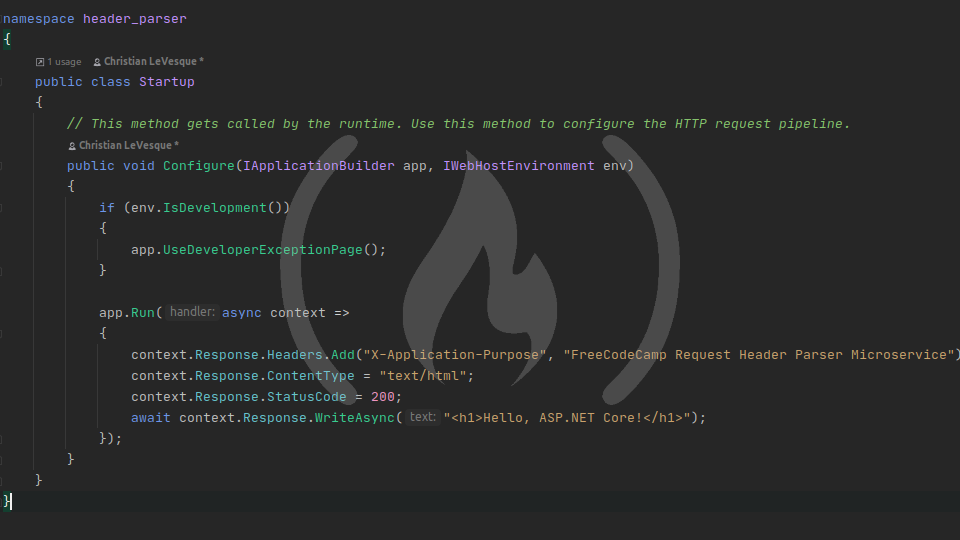
app.Run(async context =>
{
    context.Response.Headers.Add("X-Application-Purpose", "FreeCodeCamp Request Header Parser Microservice");
    context.Response.ContentType = "text/html";
    context.Response.StatusCode = 200;
    await context.Response.WriteAsync("<h1>Hello, ASP.NET Core!</h1>");
});
It's not super important that we can set the status code right now, but our microservice will return a 400 Bad Request if any of the required headers are missing, so we should still know how to set the status code.
Feel free to play around with different response status codes. The status code field is just an int so you can return any valid int as the status code - but keep in mind that your status code should probably align with the HTTP standard, and you should probably avoid using custom status codes because some platforms may not support them. For example, Postman will happily accept status codes up to 999 (even though the standard stops in the 500s), but a status code of 1000 or greater will cause a parse error.
That's it!
Now that we know how to write a simple response in ASP.NET Core, we are ready to move on to reading request headers. Then, once we can read headers, we will be ready to write the first microservice!