Introduction to Middleware in ASP.NET Core

Because the Timestamp Microservice involves responding to two different request URLs, I think it's a great opportunity to learn about middleware.
What is middleware?
Middleware is a series of functions that get applied to the requests that come into your app. Middleware is organized into "pipelines", where a request goes through the first middleware, then the second, then on "through the pipeline" to the last middleware. If you've worked with other backend frameworks before, you've probably seen something similar. PHP's Laravel and NodeJS's Express are two examples of backends that rely on middleware to accomplish tasks.
Middleware can be kind of abstract, so let's look at an example.
Middleware Example
You're working on a web-based game. Each user has an account, and each account has multiple characters in the game. Players are able to take different actions with their characters in the course of the game.
Middleware usage
A request to move a character might look like this (clearly, I'm wasted as a software developer - my graphic design career would have been stellar):
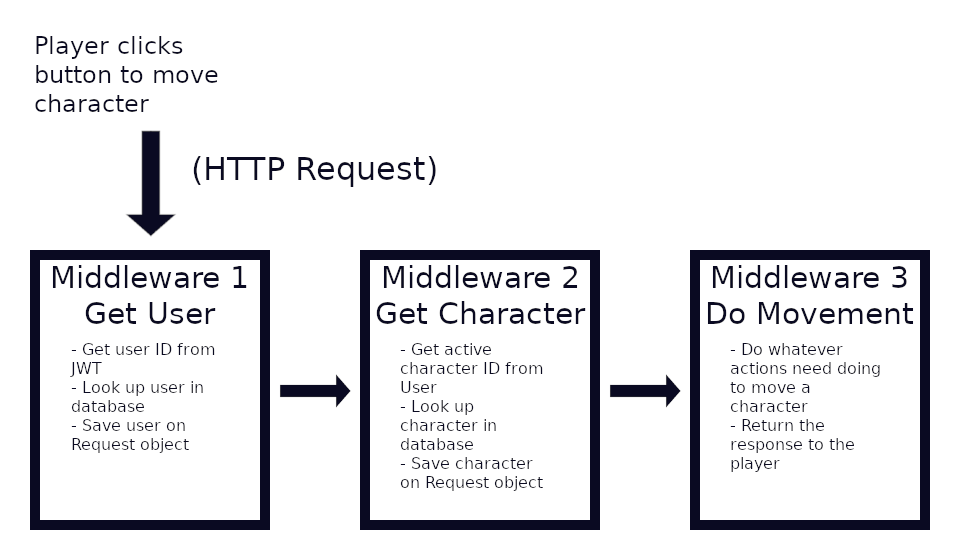
- The player clicks a button on-screen to move their character. This initiates an HTTP request to your server, where you have set up a middleware pipeline to handle your game.
- Middleware 1 is set up to get the logged in user. Your server uses JSON Web Tokens for authorization, so you look up the user based on their JWT string. You save an instance of the User object on the Request.
- Middleware 2 is set up to get the active character. You look at your User object and see the active character ID, so you use that to look up the character in your database. You save an instance of the Character object on the Request, too.
- Finally, Middleware 3 is set up to actually perform the character movement. When the movement is complete, a response is sent back to the player's browser.
Why middleware?
Middleware breaks an application down into small, manageable pieces. It allows the developer to think about their application in discrete parts, so they can minimize side effects of their code and organize their app in ways that make sense.
Middleware also allows you to short-circuit the pipeline, which is when a middleware returns a response early instead of passing off to the next middleware. When might that be useful?
In our game example, there are three middlewares. Each of those middlewares might need to return before successfully completing a move.
Middleware 1
Middleware 1 authorizes the user to access the application, and there are several ways in which that might fail.
- Session timeout. If the JWT is expired, the user won't be able to access the app.
- Invalid JWT. If the user tries to forge or modify a JWT, the app will detect it and the user won't be able to access the app.
- Invalid user ID. If the user deletes their account but they still have a copy of their JWT, they won't have a valid user ID.
In all of these cases, the middleware would short-circuit. There's no need to look up character information if you know the user isn't authorized to use the app!
Middleware 2
Middleware 2 pulls the user's character information into the app. That might fail if:
- No character. If the user hasn't yet created a character, they won't be able to participate in the game.
- No active character. If the user just deleted a character and hasn't set a new active character yet, they won't be able to take any actions until they set a new active character.
If either of these is true, the middleware would short-circuit. Don't try to move a character that doesn't exist!
Middleware 3
Middleware 3 actually performs the movement, but that won't work in some cases:
- Character in place. If the player tried to move their character into the same spot they're already in, the movement would fail.
- Movement invalid. If the player selected a movement destination that was invalid (wrong direction, too far away), the movement would fail.
- Character unable to move. If the character has modifiers in place that prevent it from moving, the movement would fail.
Adding middleware to your app
Now that we have a better idea of what middleware is and how it can be useful, let's add some basic middleware to our app. Open Startup.cs in the code you checked out of GitHub. Firstly, add using Microsoft.AspNetCore.Http; to your using statements, then add the following code at the end of the Configure() method:
app.Use(async (context, next) =>
{
    context.Response.Headers.Add("X-Application-Purpose", "Timestamp Microservice");
    await next.Invoke();
});

app.Run(async context =>
{
    await context.Response.WriteAsync("You got an extra header!");
});
We've already seen app.Run(), so there's nothing strange there. However, app.Use() is new.
app.Use() method
app.Use() tells the application to register a middleware function. Its only argument is a delegate that returns Task.
The delegate receives two arguments: the same HttpContext object that app.Run() receives (called context here), and a reference to the delegate representing the next middleware function in the pipeline (called next here).
You can call app.Use() as many times as you like, and each time, another middleware will be added to the pipeline. Middleware is registered in order, so you control how your app runs.
What the app does
This app adds one middleware using app.Use(). All that middleware does is add an extra response header to the HttpResponse, then it calls the next middleware with next.Invoke(). But after that, your app sends the response from app.Run, so what is getting called by next.Invoke()?
As it turns out, that would be your app.Run() delegate. app.Run() also registers a middleware into the request pipeline! However, the middleware registered by app.Run() is a special kind of middleware called a terminal middleware, meaning that it sends a response instead of calling another middleware. With app.Use(), middleware can choose to either send a response or call the next middleware (but it can't do both), but with app.Run(), its only choice is to send a response. (When app.Use() middleware sends a response instead of calling next.Invoke(), that middleware becomes a terminal middleware too.)
Run the app
Go ahead and run the project, then jump over to Postman and send a request to http://127.0.0.1:5000. Inspect your response headers - you should see X-Application-Purpose in the list with a value of Timestamp Microservice, and the body should simply say "You got an extra header!"
Adding more middleware
Let's play around with some more middleware examples!
Making an optionally terminal middleware with app.Use()
You can use app.Use() to create middleware that either calls the next middleware or sends a response. The middleware will check for the presence of some arbitrary condition, then decide whether to call the next middleware or respond immediately. To see this in action, modify your app.Use() delegate to look like this:
app.Use(async (context, next) =>
{
    if (context.Request.Headers.TryGetValue("X-Application-Purpose", out var purpose))
    {
        await context.Response.WriteAsync($"You already have a purpose! Your purpose is {purpose}!");
        return;
    }

    context.Response.Headers.Add("X-Application-Purpose", "Timestamp Microservice");
    await next.Invoke();
});
This checks to see if the X-Application-Purpose header is set on the request. If it is, the middleware terminates by sending a response ("You already have a purpose! Your purpose is <value of X-Application-Purpose header>") and returning before the call to next.Invoke(). If it isn't, the X-Application-Purpose header gets added as before and the next middleware gets called.
If you run the project again and switch to Postman, you can see that just making a request like before has no change. However, if you set the X-Application-Purpose header on the request and give it a value, your response will give that value back to you and the response won't have the X-Application-Purpose header on it.
Adding path-dependent middleware with app.Map()
You can branch your entire Configure() method using the app.Map() method. This can be really useful depending on your application type.
app.Map() doesn't receive an HttpContext like app.Use() and app.Run() - it receives an IApplicationBuilder, just like the Configure() method itself! That gives you a ton of flexibility when it comes to adding middleware, because you can use the IApplicationBuilder in app.Map() to call app.Use() and even app.Run(), creating different terminal middlewares for different parts of your app based solely on the URI.
To see app.Map() in use, add the following code after your if (env.IsDevelopment()) {...} block and before your call to app.Use():
app.Map("/trigger-map", builder =>
{
    builder.Use(async (context, next) =>
    {
        context.Response.Headers.Add("X-Proof-Of-Middleware", "I was executed!");
        await next.Invoke();
    });
});
app.Map() has two arguments: a PathString representing the URI to match, and a delegate receiving an IApplicationBuilder. Since there is already an IApplicationBuilder in this context called app, I chose builder for the name of this IApplicationBuilder. Inside the delegate body, you can use builder the same way you use app, calling builder.Use() and even builder.Run() if you choose.
This segment of code adds a configuration block exclusive to URIs starting with /trigger-map. (http://127.0.0.1:5000/trigger-map, http://127.0.0.1:5000/trigger-map/again, and http://127.0.0.1:5000/trigger-map?with=a+query+string will all trigger the app.Map() block, but URIs not starting with /trigger-map will ignore it, including http://127.0.0.1:5000/trigger-mapsss and similar URIs.) A single middleware is added in the branched configuration - it adds the X-Proof-Of-Middleware response header with the value "I was executed!", then calls the next middleware.
Run this project and switch over to Postman. Now make any request to http://127.0.0.1:5000/trigger-map, and be sure to set the X-Application-Purpose header.
If you expected to see "You already have a purpose! Your purpose is <purpose here>!", you were probably disappointed. app.Map() branches your middleware configuration completely - once the /trigger-map branch of the middleware was triggered, the other branches were excluded. If you look at the status code, it's actually 404 Not Found! This is because even though /trigger-map was matched by app.Map(), there was no terminal middleware that sent a response. builder.Use() ran, but it always calls next.Invoke(). Since no middleware actually sent a response, a 404 was sent instead.
But remember, middleware is added in order. If you want to still use the "You already have a purpose!" middleware even with the /trigger-map middleware, all you have to do is move the app.Map() section below the app.Use() section - and voila! Your app will respond as it did before, and it will also still add the X-Proof-Of-Middleware header on requests without the X-Application-Purpose request header. But you still won't see the app.Run() middleware exeecute for /trigger-map requests, because the application still branches at app.Map(), and you will still see a 404 Not Found response if the /trigger-map route is accessed because there's no terminal middleware on that path.
Adding predicate-dependent middleware with app.UseWhen() and app.MapWhen()
IApplicationBuilder has two other methods for adding middleware and branching - app.UseWhen() and app.MapWhen(). app.UseWhen() and app.MapWhen() are very similar to app.Map(). In fact, the only major difference between app.UseWhen() and app.MapWhen() is that app.UseWhen() will re-join the main branch after it completes just like app.Use(), while app.MapWhen() stops at the end of its own branch when it's done just like app.Map().
Both app.UseWhen() and app.MapWhen() accept two arguments: a predicate to determine whether the middleware should apply to the current request, and the same delegate received by app.Map().
app.UseWhen()
To see app.UseWhen() in action, change your existing app.Use() to app.UseWhen() and update its arguments like so:
app.UseWhen(context => context.Request.Method == "POST", builder =>
{
    builder.Use(async (context, next) =>
    {
        if (!context.Request.Headers.ContainsKey("X-Application-Purpose"))
            context.Response.Headers.Add("X-Application-Purpose", "Timestamp Microservice");

        await next.Invoke();
    });
});
This slightly modifies the logic of the middleware. Firstly, this middleware is now only invoked if the HTTP method used to access the app is POST - that's what the predicate checks for. Secondly, the middleware now only checks to see if the X-Application-Purpose header is already set. If it isn't, it sets it with the value "Timestamp Microservice", but either way, it calls the next middleware with next.Invoke(). A request to http://127.0.0.1:5000 will now always say "You got an extra header!" as the response (this still doesn't apply to http://127.0.0.1:5000/trigger-map, because that still branches off in the app.Map() call).
app.MapWhen()
To see app.MapWhen() run, just change the call to app.UseWhen() to app.MapWhen(). Both methods have the same signature, so no other changes need to be made. Run the app and send a POST request to http://127.0.0.1:5000, either with or without the X-Application-Purpose header set. The middleware does the same as before - it sets X-Application-Purpose if it's not set already - but now if the method is POST, it always returns a 404! The reason for this is because the only middleware registered inside app.MapWhen() is a non-terminal middleware. Just like with our app.Map("/trigger-map", ...), no middleware actually returns a response, so 404 is returned instead even though the response headers are modified properly.
Now that we have a good idea of how to add multiple middlewares for handling responses, let's go ahead and build our microservice!