Uploading the Request Header Parser Microservice
Now, most of the hard work is done. But a little bit of work still needs to be completed!
Setting up your web server
Before we can move on, you need to have a web server with Nginx and the ASP.NET Core runtime installed. If you don't yet have a web server, I strongly recommend getting a cheap VPS from Vultr (full disclosure, that's an affiliate link - if you sign up for Vultr through that link, I will receive a small commission at no cost to you).
If you don't have a strong server preference, I recommend you use Ubuntu 20.04 as your server OS. If you already have a web server you want to use, then feel free to use it. If you're not sure how to set up a VPS, you can follow this tutorial from my series on setting up WordPress hosting through a VPS
Installing Nginx
To install Nginx, simply run the following command (assuming you're on Ubuntu):
sudo apt install -y nginxWe will configure Nginx as a reverse proxy to our app in a few minutes.
Installing ASP.NET Core runtime
I strongly recommend you install the ASP.NET Core runtime on your server, at least while you're working on this series. The reason is that if you create a self-contained application, the upload will be at least 50Mb, likely more - if you find you have to make changes to the application to get it to work, it can quickly eat up both bandwidth and time.
To install the ASP.NET Core runtime, run the following commands (this only works for Ubuntu 20.04 - if you have a different server OS, check Microsoft's documentation for instructions):
wget https://packages.microsoft.com/config/ubuntu/20.04/packages-microsoft-prod.deb -O packages-microsoft-prod.deb
sudo dpkg -i packages-microsoft-prod.deb
sudo apt update
sudo apt install -y apt-transport-https
sudo apt install -y aspnetcore-runtime-3.1
Configuring Nginx
Nginx is powerful and incredibly useful. You could write entire books about using Nginx, so boiling this down to a single section of a blog post is going to hurt me!
If your installation of Nginx is new, you'll probably just want to proxy all requests to your microservice. I'll be showing you how to do that here. If your installation of Nginx isn't new, you probably know enough about Nginx configuration to apply what I'm about to show you to your existing configuration.
Log in to your server and open /etc/nginx/sites-available/default in your favorite terminal text editor. The contents should look like this (comments are omitted - these start with a #):
server {
    listen 80 default_server;
    listen [::]:80 default_server;

    root /var/www/html;

    index index.html index.html index.nginx-debian.html;

    server_name _;

    location / {
        try_files $uri $uri/ =404;
    }
}
After the location / {...} block, add the following configuration:
location /api/whoami {
    proxy_pass http://127.0.0.1:5000/;
    proxy_set_header X-Forwarded-For $proxy_add_x_forwarded_for;
}
What this does is, it tells Nginx to listen specifically for requests to /api/whoami and to proxy, or forward, those requests to http://127.0.0.1:5000/, which is the IP address and port that our microservice runs on. It also tells Nginx to set the X-Forwarded-For header, which is the standard name a proxy gives to the header containing the user's IP address.
Save the changes. Your complete site configuration file should look like this:
server {
    listen 80 default_server;
    listen [::]:80 default_server;

    root /var/www/html;

    index index.html index.html index.nginx-debian.html;

    server_name _;

    location / {
        try_files $uri $uri/ =404;
    }

    location /api/whoami {
        proxy_pass http://127.0.0.1:5000/;
        proxy_set_header X-Forwarded-For $proxy_add_x_forwarded_for;
    }
}
Testing the configuration
Now, we need to make sure we didn't make a mistake. Run the following command to test your Nginx configuration:
sudo nginx -tIf there was a problem, the output will say what it was. If successful, the output will look like this:
nginx: the configuration file /etc/nginx/nginx.conf syntax is ok
nginx: configuration file /etc/nginx/nginx.conf test is successful
Enabling Nginx
Now, let's go ahead and enable Nginx as a service so it will always start up in case our server restarts while we're away. Run the following commands:
sudo systemctl stop nginx
sudo systemctl enable nginx
sudo systemctl start nginx
We stop Nginx first to make sure it has the latest configuration loaded, then we start it up again after enabling it.
Deploying your microservice
Building and deploying your microservice is something you will probably have to do on your own because it will depend entirely on your setup, your experience, and your preferred workflow. You might prefer SCP or FTP, for example, or you might be hosting on Ubuntu or Windows. I will walk you through the steps, but you will probably have to heavily modify those steps for your own setup.
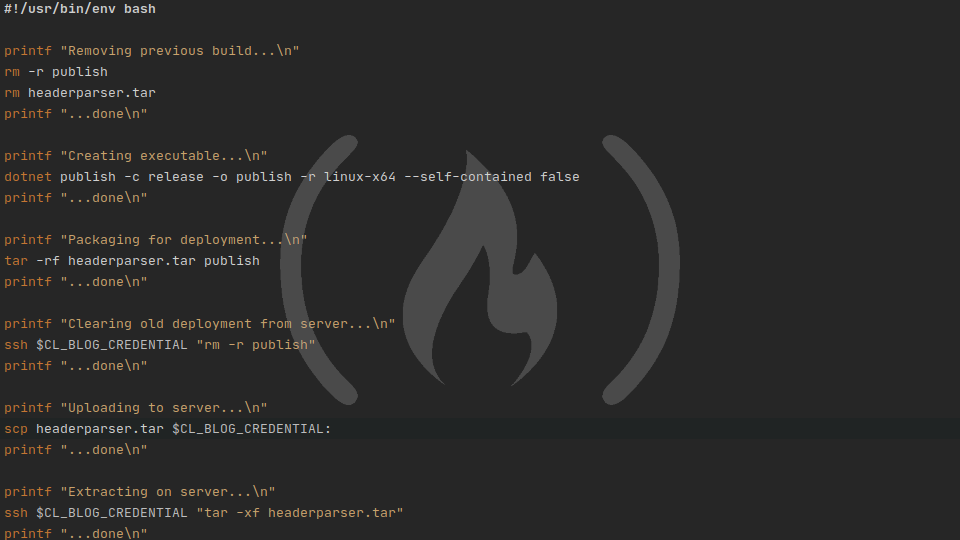
I strongly recommend you write an automated deployment script. If you've never done anything like that before, you can find a simple example in my header parser repository. This is an example for Bash, and this is an example for PowerShell. These deployment scripts will work with your application with minimal modification, so if you want to just use the scripts I have written, you can see how to modify them in the repository's README.md file An automated deployment script will definitely make your life easier - when I was writing this section of the series, I had to re-upload my application about five times before everything worked properly, and doing that manually would have been tedious.
Building your microservice
Building is done basically like any other .NET Core application. In our build, we want:
- a release version of our app for our web server (I'm assuming Ubuntu here)
- a non-self-contained version, because we want to limit the upload size in case we need to re-upload the app
I also like to output the build to the ./publish directory so I don't have to traverse several nested directories in bin to reach my binaries. To build your app, run the following command:
dotnet publish -c release -o publish -r linux-x64 --self-contained falseNow your project has a new publish directory containing your build. You will want to put this into an archive, like a .tar or .zip, and upload it to your server. I will call this file headerparser.tar but be sure to replace that with your own archive name.
Deploying to your server
Once your publish directory is archived, you can upload it. If you have an existing server with FTP enabled, you may want to use this. However, I like using SCP because your server already has an SSH server on it and that's all SCP requires. To copy your archive to your server, run this command, replacing your_username with your server username and your_server_ip with your server's IP address (if you're on Windows, you have to enable SSH in PowerShell before you can use it):
scp headerparser.tar your_username@your_server_ip:That copies the archive into your home directory on your server. Now you're almost ready to run!
Running your application
All you need to do now is unarchive your application before it can be run. If you made a .zip, you will need to install zip on Ubuntu to unarchive it. If you made a .tar, Ubuntu comes with tar preinstalled. If you need to install zip, run:
sudo apt install -y zipIf you need to unzip a .zip, run this command, replacing your_zip.zip with the name of your archive:
unzip your_zip.zipNow that your application is unarchived, you're ready to run! Your archive probably created a publish directory in your current directory, so the path to your executable is most likely publish/header-parser or something similar. Enter this path into your terminal to run the executable, and you should see output similar to when you use dotnet run in the terminal.
Testing your application
After you've gone through the series and you've written your own version of this application, you're ready to test it. Head over to the FreeCodeCamp Request Header Parser Microservice submission page, log in if you need to, and enter the URL or IP address that points to your server. Leave off the /api/whoami part of the URL because the FreeCodeCamp test runner adds that itself. Click the button saying "I've completed this challenge" and check your results!
You might need to make some modifications to your code to get it to work. Your Nginx logs (located at /var/log/nginx) and the browser console on the FreeCodeCamp page will be invaluable in figuring out why your app isn't working properly.
Potential gotchas
Here are some tricky issues that I've identified that may trip you up when you test your app. As people provide feedback, I will update this list with issues others have.
Mixed content
By default, browsers won't let you load active content like scripts or API calls over HTTP if you're on an HTTPS domain. If you observe the console while running your requests, you will get an error message. In Firefox, this message is "Blocked loading mixed active content"; in Chrome, this message is "1 Mixed Content: The page at '<website_name>' was loaded over HTTPS, but requested an insecure resource '<some_resource_over_http>'. This request has been blocked; the content must be served over HTTPS."
To fix this, you need to either procure an SSL certificate for your domain or server (which may not be feasible), or disable mixed content blocking for your browser. Here are instructions for disabling mixed content blocking in Firefox and disabling mixed content blocking in Chrome.
That's it!
1 part down! You're 1/5 of the way to having the FreeCodeCamp APIs and Microservices Certification! Well done! Now, move on to the next part of the series to get to work on the next project.